Hey everyone! Welcome to Theorycrafting: Cosplay Edition! This series will be updated weekly and features a discussion on potential ideas for the creation of a character for cosplay. This is a fairly quick look into what I might think of doing and what materials I may use when considering building a character.
If you have any requests of characters you would like to see, feel free to let me know who in the comments, on my facebook page, or via Twitter! With that being said, let us begin!
This week’s character is Nocturne (Classic Skin, League of Legends)!
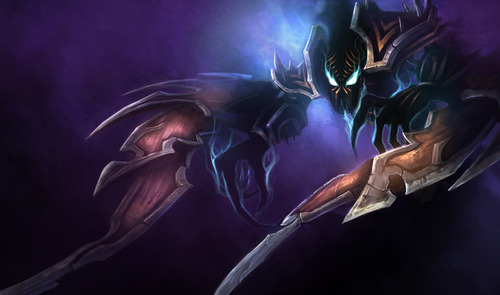
In the League of Legends world, Nocturne (3D Model) is the embodiment of nightmares and was confined to a nexus fragment by League officials and is hence bound to the physical world. His spectral, dark nature defines him and that feeling is important to keep in mind while tackling this project, so here we go!
Blades:
The arm blades are probably one of the most distinctive features on Nocturne, but they also pose some engineering problems due to weight and slipping. There are two ways to help mitigate the weight issue. One way is through material choice (can be affected by budget, crafting comfort, etc) and the other is through engineering. I’ll start with the materials first.
The least expensive option would be layered cardboard. It is easy to work with, and inexpensive. The downside to it is that it doesn’t have a particularly nice, smooth, armor-like finish and the corrugated cardboard has those gaps along the edges that would need to be sealed somehow, probably with hot glue (and it would take a lot of hot glue for the number of cut edges that would be present..).
Next, there’s expanding foam. The upside is that it is fairly inexpensive and easy to carve. The downside is that you will probably have to carve a lot and you will have to seal the foam with some other material (eg: Bondo and/or paper mache) , which can add a surprising amount of weight to the structure.
Wonderflex may also work quite well. It is easy to work with, is light and gives a very nice finish after Gesso and sanding. The downside here is cost. Wonderflex gets expensive very fast.
Probably my material of choice for this project would be sheets of insulation foam. It is a very nice, light material and would require a bit less carving than expanding foam, since it is already flat. I would take either several thin sheets and layer them, or carve two thicker sheets. The only problem I can think of would be the risk of snapping and providing a good sealant for painting. (Warning: when working with insulation foam, use a dust mask! When sanding, you may also want to cover your hair…it gets everywhere.)
This can be solved fairly easily though, with a very easy to use resin called “Crystal Sheen”. I used this sealing process on Sejuani for the boar’s mouth, tusks, and “ears”. Crystal Sheen has a very easy 1:1 ratio for mixing, and you can just pour it over the prop. It won’t eat away at the foam, so you don’t need a base sealant coat. All you have to do is make sure that the insulation foam is sanded nice and smooth before pouring.
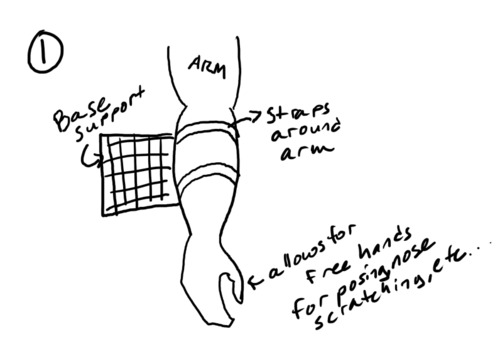
As for engineering, I think I have to sketch a quick picture to help to describe my idea. Here are some very quick sketches of the steps/layers.
Step #1:
Create a base support for the blades and your arm. I would recommend using a wire mesh, or something similar. Take a length of the mesh at the desired width and bend it at the half way point, so that it is in two layers. Then mold the open ends to your arm and secure the two layers together with straps where you want them to split apart for your arm. The mesh around the top and bottom of your arm combined only needs to go around half of your arm’s circumference.
The part in contact with your arm should probably to be padded or lined with craft foam for comfort. The support should be then strapped to your arm with at least two straps. Velcro would work fine or some other kind of attachment.
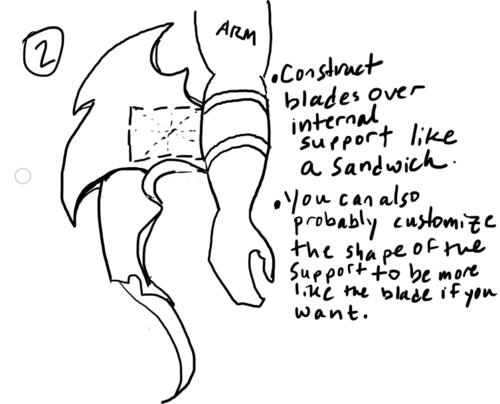
Step #2:
Build the blades over the support mesh like a sandwich, so that both sides of the mesh are covered. See figure below.
Step #3:
Create bracers to cover your arm. The bracers will have a seam along the outside of your arm to allow for the blades and will probably require some form of hinge along the inside of your arm. If you decide to make the bracers out of Wonderflex, I think you’d have enough flexibility to not require the hinge. The bracers will hide the support and help create the illusion of a seamless blade attached to your arm. The seam of the bracers will attach along the top and bottom of the blade. (Along the red line pictured below).

You can use whatever material you feel like for the bracers, though I would personally go for either Wonderflex, expanding foam, or EVA foam for the base. You could also use a fabric coated plaster to cast your forearm and then build off of that…it’s really up to you, use what you’re comfortable with and within your budget.
Shoulders:
Again, you could use any number of methods to construct and attach the shoulder pieces. I would probably go for expanding foam or EVA for this one since they are so thick, though wonderflex would probably work just fine. Just make sure to have a base dome to build off of. For the spikes, I would love to use friendly plastic, especially if I use wonderflex. Sculpy clay or something similar would probably also work well as long as you can be sure that you can secure it well.
Back and Upper Body:
I would definitely spring for EL wire/EL sheeting for this project so that it glows! For sewing the EL wire to the fabric, you will want to use fishing line or some other clear thread so that it doesn’t disrupt the glow. It would be so eerie in the dark and work really well for the character!
For the majority of the body, I would probably use a black stretch/spandex fabric, at least as a base. If you need to/feel like bulking out your frame a bit to match the silhouette, you can sew in upholstery foam into a pocket of fabric. It would be something like this: your big piece of fabric on top, then foam, then sew in a lining of fabric around the perimeter of the foam to keep it in place…as well as for comfort. See figure below.

This would also be a really good idea for the upright back plates/ridges. Then the plates poke out through the fabric, making it seem more seamless.
You may also want to incorporate some armor belt/pieces for the waist area to make a jointed effect. You could also probably get a similar effect by layering fabrics too.
For the hands, again, I would use a stretch fabric to make gloves over some really awesome long, extended, creepy fingers. What you’d do is take wonderflex, or whatever you decide to use, and mold it around your fingers to get the right shape, while making sure they fit comfortably over your own. You then take the black fabric and create gloves over the fake fingers and your own hand. Also, don’t forget the lights for the back of the hands!
Lastly, for the face, it is up to your own comfort level for how you want to go about it. You could use a ski mask/hood, spandex hood, or you could create a flat face mask over your own so that you don’t have a nose. It’s really up to you…I would love to see lights in the face, though! As a note, there are also a couple of black spike things protruding from the back of the head. You could just take black fabric and use stuffing to make the spikes.
Particle Effect/Lower Body:
So, this is probably what everybody is wondering about since Nocturne isn’t exactly…human shaped. Fortunately, there are plenty of different fabric choices, layering, and sheer fabrics to choose from! For the head, you could set up some wire and sheer black fabric so that it looks as though it is wafting upward.
There are a number of ways you could tackle the legs. In general, you will probably want to use sheer fabric. I think that aiming for a sleeker design would be a good thing since it would contrast nicely with the torso’s spikiness.
Here are a few rigging options that might work:
You could do a design similar to the head with wire and sheer fabric to create a tail.
You could obtain some clear platforms and then have fabrics dangling down past your feet to simulate floating.
Fishing line rigged from the tail to your hand could also create a wispy effect.
If you wanted to go really hard core, you could wear high clear platforms (for the floating effect) and create a tube for your legs and feet (similar to a mermaid tail) so they are stuck together. Then you would trail out the tail behind you or to the side with fishing line rigging or wire support. You could then bend your knees, etc, to create a curve for the tail.
At the end of the day, it comes down to what you can afford/feel like doing and your own comfort (clear platforms aren’t for everyone ^_^)
With all of this said, do you have any ideas or methods that you would rather employ? Leave your questions and/or comments below! I’d love to hear what everyone else’s thoughts are!
Also, feel free to let me know what you think and if you have any suggestions on how to make this better!