Hey everyone! Welcome to Theorycrafting: Cosplay Edition! This series will be updated weekly and features a discussion on potential ideas for the creation of a character for cosplay. This is a fairly quick look into what I might think of doing and what materials I may use when considering building a character.
If you have any requests of characters you would like to see, feel free to let me know who in the comments, on my facebook page, or via Twitter!
As a side note, I received a request to take a look at Redeemed Riven. Lucky for you, Zerina Cosplay has made an absolutely stunning Redeemed Riven, so if you have any questions about how to construct that costume, I’m sure she would love to help you out. With that being said, let us begin!
This week’s character is: Fiora (Classic Skin, League of Legends)
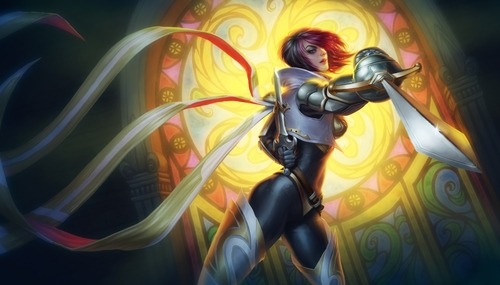
Everything about Fiora’s design (3d Model) says grace and elegance. From her history as the most famed duelist of Demacia to her rise to the head of her own house, her character is focused on meeting challenges with honor and style. For me, it would be really important for this costume to be streamlined and very form-fitting.
Body:
For the base of this costume, I would suggest utilizing either a black or very dark gray body suit. It will outline the body nicely and will serve as a good base to attach the armor to.
You can easily purchase a bodysuit online for about $50, though, if you wish to incorporate some of the custom seams, you may want to consider making it yourself out of a spandex or spandex-like material. The most important thing about the body suit is that it is form fit.
How do you make something form fit?
For patterning the bodysuit and any other armor piece that may be form fit (eg: bracers, boots, chest piece), I suggest using a tape method. It is quick, easy, and yields good results.
So, how does it work?
1.)Take some form of thin plastic (plastic wrap or plastic bags work well) and wrapping it around the desired area. The plastic makes it so that the tape won’t stick directly to your body.
2.)You then take either duct tape (Yay! Duct tape is so useful!) or masking tape and wrap that around the area.
3.)You then use scissors to cut yourself out of the tape…and voila! You have a pattern that will be form fit!
Note: for dome shapes, you may need to cut the pattern a bit to allow for a dart or seam.
I have found this patterning method very useful for creating a lot of my various armor and fabric pieces.
You can also use this method to create a duct tape dummy of yourself and use it like a dress form. Simply do the above steps utilizing your torso. After cutting yourself out of the pattern, tape the seam back together with more tape, then stuff it with newspaper, plastic bags, or whatever kind of stuffing material you may have. You can also build in a coat hanger at the neck if you want to suspend the form!
Boots:
The goal for the boots, in my mind, is to keep them form fit, yet wearable. At the same time, they do appear to be armor, which suggests clunky. I would tackle the problem with a combination of wonderflex and spandex. For the fabric, you could incorporate multiple colors or use fabric paint to achieve the color differences. I think I, personally, would use different color fabrics for this project, as stretch fabrics don’t usually hold paint that well and don’t retain the same level of flexibility after painting.
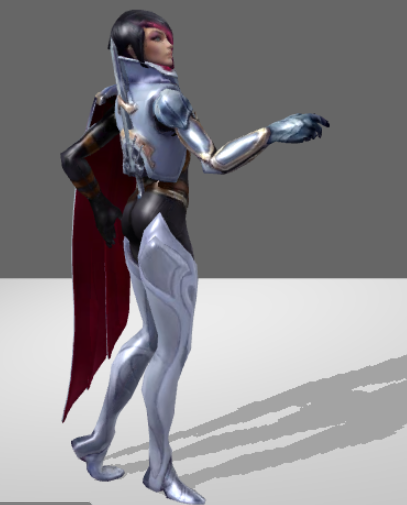
First, I would make a wonderflex form of my quad, shins, and kneecap. I would then create the full boots out of fabric and incorporate a sleeve for the wonderflex pieces so that they would act as an internal stiffener for the overall look.
You could probably integrate some other material into it rather than wonderflex, but I think wonderflex would have a really great level of stiffness and armor feel to the boots.
For the inside of the calves, I would try and make a quilted look. The shoe part could quite easily be a modified low heel shoe. Overall, you may also want to incorporate some velcro along the thighs to help keep the boots up. It also appears that the majority of the boot is a cover that can be hooked under the heel, which makes for an easier time for construction.
Just make sure that you don’t have any wonderflex on the back of the knee and along the back of the calf, as you will need to retain some level of flexibility and comfort.
Jacket:
For the jacket, it looks like a pretty stiff material, especially for the collar. I would use interfacing between the outside and lining fabric to make it all stiff. As for fabric choice, I would try for a low shine, rich feeling fabric, like a form of bridal satin. Fiora is nobility, after all! The red inner lining may work well as a slightly shinier fabric than the outside layers, or perhaps a velvet. It’s up to you!
The same thing would go for the shoulder cape-like thing. Rich, low sheen fabrics on the outer side, and a very rich, maybe shinier inner lining.
For the back of the coat, there is a frame to hold Fiora’s second sword. First off, you may want to reinforce the gold arch area with possibly wonderflex sewn into the coat to keep the coat and frame from bending. I would then try for a wire frame of some kind. For wire, I would probably go for aluminum wire, as it is easier to work with at smaller gau ges (thicker wire). I would probably also have a flat backing for behind the cross hilt and wire coming below that to hook under the rest of the hilt. Then you could rest the sword in its place while still being able to take it off and brandish it! Hoorah for functionality!

Armor:
For the left shoulder piece, I would definitely try to use wonderflex covered in fabric. For the right shoulder, it appears to be more metallic as well as an extreme dome shape (wonderflex does not like becoming a dome). I may want to use a different material for this piece, such as expanding foam with paper mache (Wonderful tutorial on this by Kamui Cosplay: http://www.youtube.com/watch?feature=player_embedded&v=bn_RosA4uFc#!). After the piece is smooth, you can paint it!
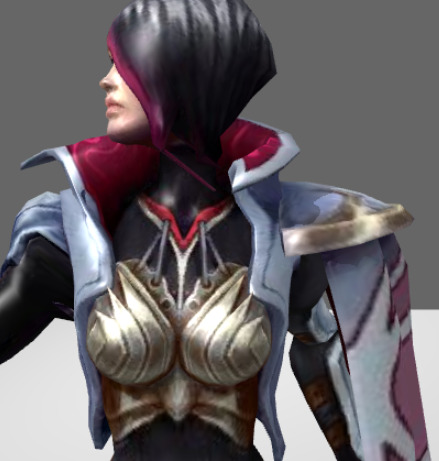
As for the chest piece/other armor, I would personally head straight for wonderflex as a base material. Yet, there is also a new thermoplastic material out there that is very much like wonderflex called Worbla that I would really like to try out. It is very much like wonderflex in how you work with it save one thing: it can form domes!
That’s right folks! Worbla can form domes because unlike wonderflex, it does not have a fabric/woven base to it that restricts its possible forms. Because of this, it can also be smooshed and sculpted for 3d Details. The only downside that I see with worbla, as it is with wonderflex, is that it gets expensive.
That being said, you could also use the paper mache, styrene, craft foam, or EVA foam to make the chest piece if you would like to keep a budget. The advantage and draw for me and the thermoplastics, though, is the ease of fabrication and the sturdiness they provide to the final product.
Wig:
For the wig, you may be able to find a custom wig online, though if that doesn’t work, you can probably dye the wig yourself with sharpie. Here is a very good tutorial on wig dying by Epic Cosplay: http://www.youtube.com/watch?feature=player_embedded&v=CA0Bvv3fqHk
Weapons:
The thing with the weapons is that it depends on what materials you feel comfortable working with, as well as logistics. You may not want to swing around two big heavy pieces of metal, and conventions may frown at you and confiscate your weapons if they look too dangerous. That being said, you can make very realistic looking weapons out of wood, insulation foam, or expanding foam.
The foam options will certainly make for the lightest weapons while wood will be more durable.
You will want to make sure that there is good support through the length of the blade if you go with the foam options, especially since they will be rather thin blades. A thin dowel down the center of the blade would probably be a very good idea.
For the hilts, you could cast them out of resin, sculpted from clay, paper clay (paper clay can be sanded!), paper mache, or Apoxie sculpt, to name a few options.
With all of this said, do you have any ideas or methods that you would rather employ? Leave your questions and/or comments below! I’d love to hear what everyone else’s thoughts are!
Also, feel free to let me know what you think and if you have any suggestions on how to make this better!