Hi everyone! This is our next cosplay tutorial by Danielle Beaulieu, who debuted an absolutely stunning Zyra cosplay at PAX East. Her Zyra uses some gorgeous prosthetics, so we asked her if she would write a tutorial on applying prosthetics with liquid latex and she generously obliged! If you have any questions about working with liquid latex or you’re just curious how it’s done, read on.

Liquid latex is the best skin adhesive you can buy. It works well holding heavy prosthetics onto skin, and can also be used to give them a seamless finish for your look. If you need to adhere something to your body free-floating, liquid latex will work perfectly for you. It also holds incredibly well in areas where you will be bending or flexing.
If you are like me, you might be a little intimidated to try it for yourself. You are probably thinking only professionals have the skill to use it correctly and it might be a waste of your money. Well, I am here to tell you just how easy a beginner like yourself can give any cosplay makeup a professional approach with minimal skill. Lets begin!
The first and most important step before you start is to be absolutely certain you are not allergic to latex. You probably know if you are by now, but if you are ever uncertain it is probably wise to do a small test on a little patch of skin before you ever put it on your face. If any irritation occurs at all, you should avoid liquid latex completely.
You’re probably going to have two options when selecting your latex. Clear, and flesh toned. It really does not matter which tint you buy because you can mix your foundation directly into the latex, or apply makeup over the latex when it is dry. Personally I chose the flesh tone.
If it’s possible, it is always good to have a helping hand with you. Of course it is not absolutely needed, but having someone there to hold a piece for you while it dries can really take the strain off your arms, and can give you free hands to start working on another piece to apply. It takes a good amount of time for the latex to dry, and before it dries, it needs to be held firmly in place or your piece will fall off. Having a helper can cut the time it takes to put all your pieces on and do your full makeup in half. Not to mention, they can always get into areas above or behind your prosthetic that would be hard to see yourself.
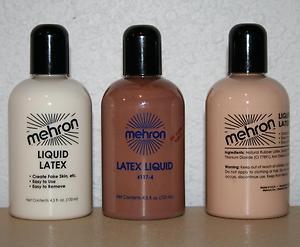
When first opening your bottle, you’ll notice a very strong smell that can get you very lightheaded. This is from the ammonia in the latex. When the ammonia evaporates, the latex will be firm. You might want to open a window when working with it, especially if you are going to have it near your face.
If you are applying the piece to your face, make sure any hairs around your hairline are brushed back, or shaved. Avoid your eyebrows if you can. There are methods of covering the eyebrows to lessen the chance of the latex pulling your hairs out, but that is a different tutorial entirely. The only way to get the latex out of your hair is by shaving it out or pulling the hairs from your scalp, it will not return to it’s liquid form in the shower.
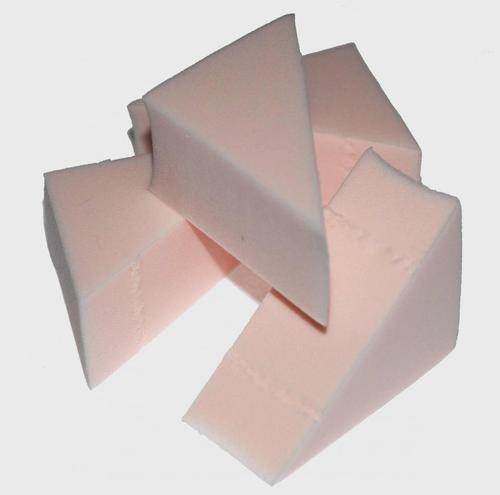
The materials you will want to use for applying your liquid latex must be disposable. Q-tips work well for globbing it into cracks, but I have found makeup sponges work very well for patting it down neatly. It will ruin any of your makeup brushes so don’t apply it with anything you care about.
When you are finally ready to put your piece on, glob the latex all over the part of the prosthetic that will be touching your skin. Now, apply the prosthetic to your face exactly where you want it to be positioned. Don’t worry if you miss your mark, you can adjust the piece for a short amount of time but it is not wise to mess around with it too much. When you have it where you want it, take either your q-tip or makeup sponge and dab some latex around the seams of your piece, so you have the liquid latex on both the prosthetic and your skin around it. Now, wait for that layer to dry. This is where it helps to have a friend. Your arm will get pretty tired, but try not to lift or wiggle the piece or you will make it harder on yourself to get the piece to dry in place. Try not to pull at the latex, you could ruin it, and by now you definitely won’t want to start over. You can always rest your arm on a surface and hold it there, but try not to get distracted because it’s really easy to move your hand just a centimeter and pull the latex up.
When using thin layers, it should not take more than a few minutes to start to dry. I’d say eight minutes for it to dry completely. You’ll want to make sure you are using thin layers because it will stay gooey on the inside if you glob on too much. Once your first layer is dry, you can start adding another layer of liquid latex. This entire time you should still be holding your piece in place with one hand, because the latex might not be strong enough to hold it on it’s own yet. If you really want to blend your piece into your face, it helps by adding pieces of single-ply toilet paper over the first layer before starting your next layer. All you have to do is position the toilet paper, half on your piece and half on your skin, and apply the latex over it.

You will notice by now the seam is starting to disappear and your piece is starting to “flow” into your skin. You can remove your hand from your piece and let it hang a bit once your second layer with the toilet paper is dry. If you notice any tugging, keep holding it. When it is secure, it should just feel like a natural part of your body, there should be no pulling or discomfort. To be safe, I would add at least four layers of latex with the toilet paper.
When you are applying your final layers, try to take a makeup sponge and lightly dab outwards from your piece and onto your skin to get a smooth, natural look. Once all of your layers are dry, simply add your foundation, makeup, or body paint over the latex on both your skin and piece and blend it into your skin, and there you go! A flawless, professional looking makeup that will be sure to impress a crowd!
When removing your piece, carefully pull at the base where your prosthetic meets your skin. The latex holds so strong, that you might rip or break your piece when trying to remove it so be careful. It is normal for this process to sting, and it will take all of your peach fuzz or hairs with it. The pain isn’t unbearable, but if you are having trouble just pull off a little bit at a time, it can’t re-adhere in the places you already pulled off.

After you use it for the first time, you will discover just how many things it can be used for in cosplay, and how easy it can make things that once seemed difficult or impossible to you!
Pro Latex Tips:
– You can mix a tiny bit of pigment or foundation directly into your latex before applying if you prefer.
-You can use liquid latex to create wound effects by adding a few layers to your skin, and then pulling it up and ripping the center, then applying your makeup over it.
-You can also also use Liquid Latex in molds to create your prosthetic pieces! All you have to do is lightly paint it into your mold using a similar layered method.