Hey everyone and welcome to Theorycrafting: Cosplay Edition!
This series features my ideas for how to potentially bring a specific character to life for cosplay. My hope is to give people a quick look into my design process and what materials I like to use use when considering building a character.
As always, discussion and recommendations of which characters (from any series/game, etc) you would like to see theorycrafted in future are more than welcome. ^_^
This week’s character is: Thresh (Classic Skin, League of Legends)
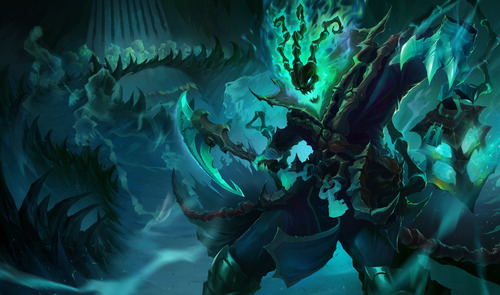
Thresh was a jailer in Valoran hundreds of years ago, famed for his sadism and his love of chains. He tormented his prisoners to madness and death for years, until one night when they all broke loose and hanged him from his own chains. He returned as a dark spirit, stalking across the land in search of souls to steal away. No one knows what his new purpose is, or why he’s chosen to join the League of Legends, but everyone remembers the children’s rhyme: Cling clang, go the chains, Someone’s ‘bout to find you, Cling clang, oh the chains, The Warden’s right behind you….
Thresh is one of the creepiest champions in League of Legends, and it’s a really important aspect of this costume. How you carry yourself will make or break this costume, but it’s also really important to make sure that the headpiece and scythe are intimidating. The movement of the chains is also a big part of the costume, so make sure that the stiff parts don’t move and the supple parts do. Getting the color scheme right is also important, otherwise the costume will look silly.
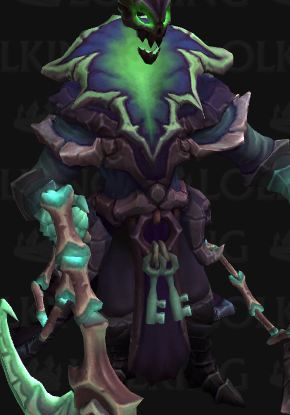
Head:
I imagine starting out making a base ski mask-like hood out of a green stretch fabric that covers your head and neck. You can probably leave the eyes and mouth open so that you can easily see and breathe. Breathing is a good thing.

Once you have the hood made, you can create the green particle effect with translucent cellophane, or the clearish stuff they use for gift baskets and flowers. I would use mostly green cellophane, but also include a little bit of blue, yellow, and clear cellophane and crinkle it a little to create a more dynamic look. Once the cellophane is attached to the hood, I would rig up some LEDs or EL wire around the base of your neck and perhaps integrate some lights in between the cellophane sheets. I would also rig up some LED’s around your eyes and mouth to make them glow. You’ll also want to black out (or green-out, whichever looks better) around your eyes and mouth so that you don’t have your skin color peeking through.
The base mask/face portion could be created out of any number of materials. You could cast the base with plaster (discussed previously in Nutcracko Theorycraft), or you could use paper mache, clay, fosshape, etc. It’s entirely up to you. Since the jaw is not directly attached to the upper portion of the face, you could link it with something like fishing line to keep it in place.
For the head chains (I guess that’s what they’re called?) I would start out with creating a base from segments of PVC pipe. If you need it to bend, you can use fittings or heat the pipe over an open flame and bend it that way. Between each of the segments, there is a glowing portion, so I would insert a small section of clear plexiglass pipe with an LED in it! I think this would make for an awesome effect!
Additionally, once the PVC base is put together, I would apply and carve expanding foam (Tutorial by Kamui) to each segment so that you get a more custom shape to make it look like bone and have flares on each end.
Coat:
For the base fabric, I would go with a heavy, utilitarian material such as canvass or wool. Basically, something that hangs really well. Colors would be a really dark grayish-blue and a dark purple.
For the edging/chain-like portions, I would do the same pvc-expanding foam segment method as it was for the head, save for the plexiglass pipe, since these bone segments don’t glow. Instead, I would install links made with either wire, or chain segments between the ends of two segments. I would not, however, thread them together like beads, since I think the joins would be too loose and floppy. However, for the coat tails, I may thread the segments together with a stiff wire after they are attached together so that they can hold the semi-suspended curve shape.
Once you have it threaded together and painted, I would finally attach/sew the segments to the coat with fishing line or some other clear thread so that they can shift a bit so you can breathe and so that it moves a bit with the fabric, but does not come loose.
For some of the segments, specifically the one going down the middle of the coat tails, you might want to consider carving/forming them out of sheet insulation foam, cutting them in half, and then sandwiching the fabric between two halves.
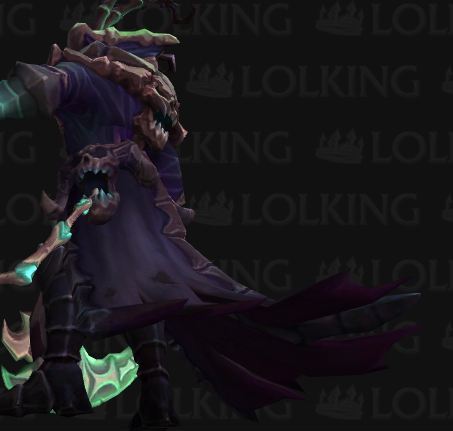
Likewise, for the skulls, I would recommend either carving them out of insulation foam or forming them with worbla.
Lastly, for the collar of the coat, I would probably form it with fosshape to make it really nice and stiff, then covering it with fabric. Since the edging is so unique I would use friendly plastic over the fabric to shape it and then paint the friendly plastic.
Boots:
For the boot armor, I would go out and find a pair of black shoes and then build the armor to fit around them and your leg. For materials, I would probably use either wonderflex or worbla since they are sturdy materials, and will give a really nice finish. You could also probably use EVA foam, styrene, or fiberglass, but I think the wonderflex/worbla would be easiest to work with and give the nicest results. I would not use craft foam, as it breaks really easily, especially when it’s close to a joint or other high stress area of the body.
Hands:
The hands appear to be armored, so, as with the boots, I would recommend building them with wonderflex or worbla over a green or black glove. The painting for the hands will be key, as there’s a lot of gradient color going on and color choice will matter. Try to keep the colors consistent with the other glowing areas of the costume.
Weapons:
I would use the same pvc-expanding foam and wire/chain joint method as I described above for the flexible chain portions of the scythe and lantern.
Lantern:
For the lantern, itself, I would probably create a pvc pipe base frame and later embellish it with the expanding foam method.
As for the openings/glowing inside, I can’t quite tell if there are supposed to be panes of glass or not.
If you interpret that there is glass, you can probably create a groove in the pvc pipe and slide in panes of plexiglass. In this case, I would make sure that the top of the lantern could be taken off so that you can access the inside to install and manage lights and cellophane.
If you don’t think there are glass panes, then I would install a plexiglass tube/post down the middle of the lantern and build off of it for your lights and cellophane glow effects.
Scythe:
There are a number of ways to create the scythe depending on your skill set and budget. I would aim to make it light, since you’ll be carrying it around all the time and the lantern will probably be a bit heavy. That being said, I would not recommend building it out of wood. I would probably lean towards a pvc pipe base for the handle with expanding foam over that to get the unique shape, and then sheet insulation foam (or expanding foam) with a supporting core for the blade.
That pretty much sums up how I would take a crack at creating a Thresh cosplay. If you have any questions or would like anything clarified, feel free to ask me, or if you have any requests for characters you would like to see, just let me know in the comments!
Thank you for reading, if you want more, check me out online at my Facebook Page or via Twitter.