Tcha cha cha cha! Bullets!!! The Pow Pow WIP article is finally written! Yes, the barrels do spin! This gun was probably the most technically challenging for me to make out of the three. I made a lot of mistakes throughout the process, but I also learned a ton from those mistakes. I also had a lot of amazing help from friends, especially from Mario of Arms, Armor and Awesome who let me pick his brain and use his shop . If you are interested in the construction of the main costume, check out the WIP article! There is also a WIP about the Zap gun!
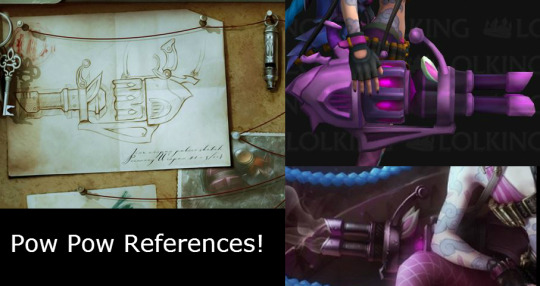
The first big decision was to design and draw out the overall look of the gun. I used the three official references—the splash art, the in-game model, and the music video—and looked at a bunch of
other fan art until I was able to piece together the final profile I wanted. I wasn’t such a fan of the boxier version shown in the music video, but I wanted to stay close to the official design so I used the official teaser sketch, the 3D model, and the splash art to create a well-proportioned and sleek version of Pow Pow.
After a lot of sketching, I came up with a design that I liked and it was time to start thinking through materials and construction methods! My first thought was to break down the gun into parts and then into pieces. I started with the back half of the gun and split it into three pieces; the butt, the round barrel, and the bottom strut. I knew that these pieces would have to be sturdy and hollow to allow for the electronics that I had planned, so I knew that resin casting might be a good option. The other option that I had heard about was vacuforming the pieces, where a piece of plastic is heated and then pulled over a positive mold on a vacuum table to create a hollow cast. This method would cut down on cost and on the overall weight of the piece, so I figured I would try vacuforming first. If it didn’t work then I would cast the pieces. Either way, I had to create masters of the prop.
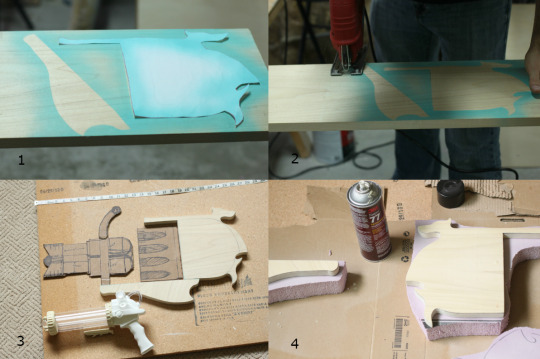
For the masters I used a vertical core of poplar wood as the base, which I planned to integrate into vacuformed pieces to add strength and carve the rest of the shape out of pink foam (I found out later that pink foam was the wrong choice, but we’ll get to that in a bit). I drew out the profile on paper, traced it onto the wood board and cut the pieces out with a jigsaw and scrollsaw. Once the wood was shaped to my liking, I used spray adhesive to adhere and build up the pink foam sheets on either side of the wood core. At this point, the gun was set to be about 24 inches long.
After my foam blocks were all adhered, it was time to shape! I used a Dremel tool and utility knife for some of the initial cuts, but I used a really harsh rasp and sandpaper (80-220 grit) to do the majority of the shaping.
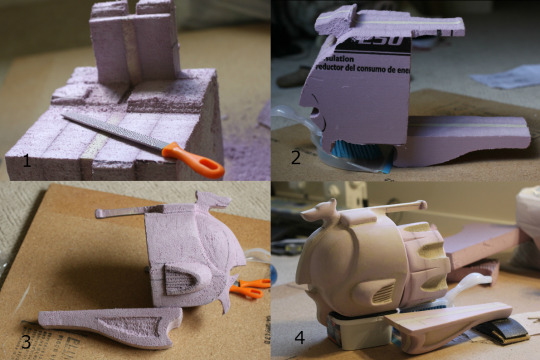
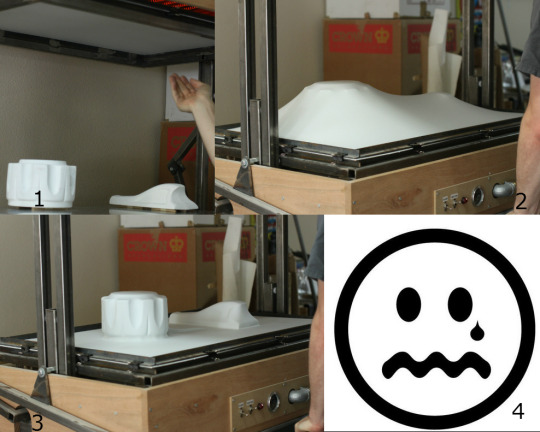
I used some wood filler to fill in some of the imperfections and then sealed the foam with a couple of coats of gesso before the first vacuform experiment. The problem that I ran into was that pink foam is too soft and too susceptible to heat to hold its shape under the stress of the suction and heat of the plastic. The foam got crushed and the forms didn’t take. Huge mistake on my part! At least I learned this lesson: Do not vacuform sheet insulation foam!
With that disaster out of the way, the foam bucks were still salvageable, so I went ahead and resigned myself to salvaging the two bucks I had tried to vacuform and getting all of the masters ready for molding and casting. In order to do this, it meant that I had to spend a lot of time salvaging the bucks with Bondo, spot putty, sandable primer, and a LOT of sandpaper.
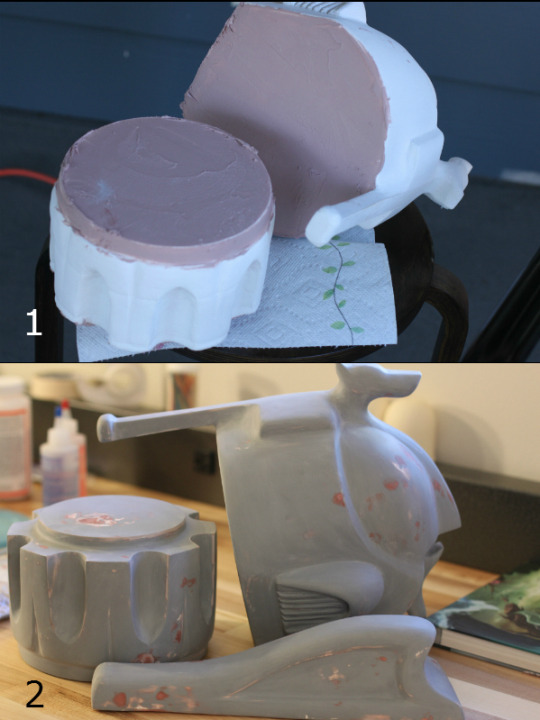
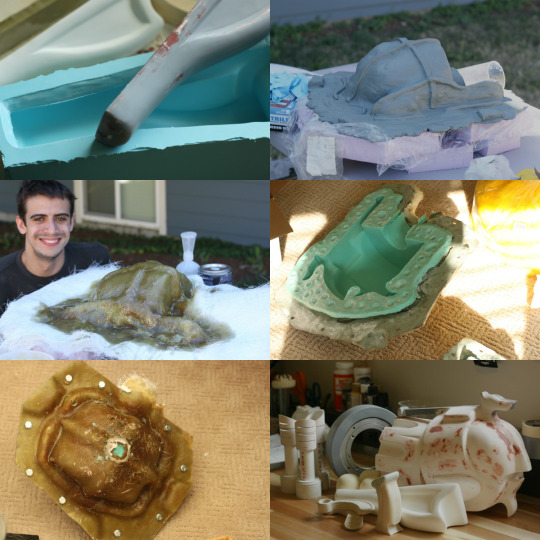
With the masters finally done, it was time to get the molds ready and cast the pieces. The bottom strut piece could be molded with a simple one piece box mold. I used the last of the Oomoo silicone to create this large box mold. It created a pretty heavy strut piece, but I prefer to have a solid, strong piece over something that may break.
The other two pieces need to be slush cast, but we also wanted to conserve some material and have a manageable mold to slush cast. This meant that I had to try my hand at a two part matrix mold. It took me and Ian about three whole 12-16 hour long days to create the molds, but we managed it! They certainly weren’t pretty molds and I learned a lot through creating them, but at least they got the majority of the work done!
The masters were completely ruined after extracting them from the molds. I salvaged the top section of wood in the back gun butt piece to integrate into the casting and reinforce the mini strut along the top of the gun. The raw castings were pretty rough and required a lot of cleanup, but in the end, they turned out pretty well!
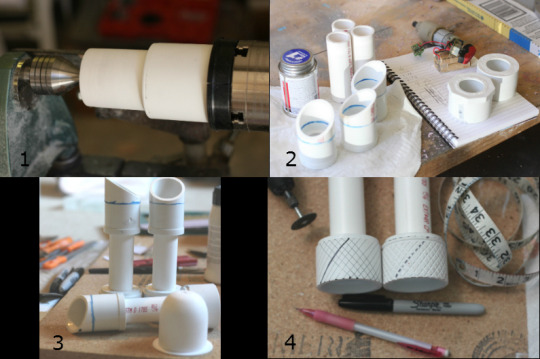
With those cast pieces done, I’ll backtrack a bit to talk about how the barrels and spinning ring were made.
First off, the barrels were separated into two distinct parts, the front barrel and the back butt since they would be separated by the spinning plates on the support ring. The butt of the barrels was a
solid 3” diameter block of resin that I poured, lathed, sanded, and later molded and cast to create three identical pieces. The front sections of the barrels all started out as PVC pipe and fittings.
The back-most fitting was lathed down to the shape I wanted. Once the base shapes were set, I took a Dremel with the cutting disk attachment and cut the vent lines and texture cross-hatch.
The mounting ring was made of wood. We used a router to create a perfect circle as well as an inlay ring for the ball bearing lazy susan, which would be the base of the spin mechanic for the barrels. I sanded the very bottom of the ring flat so that it would sit flush on the bottom strut. To mount the barrels to the ring, we used two circles of plywood that were inset into the ring. The front part of the barrels were screwed on through one circle of plywood. We had spacers on the screws to keep the two plywood plates at the correct distance. The butts of the barrels were attached to the ends of the screws to cover them up and keep everything in place.
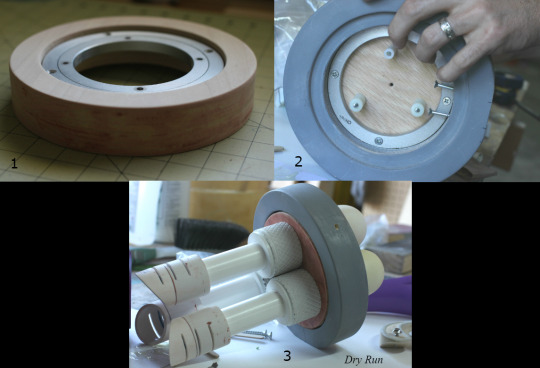
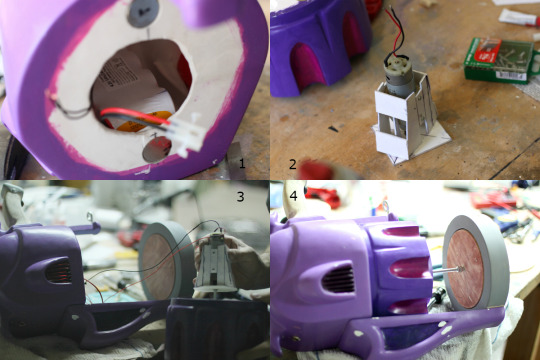
The very last big portion of the gun to be put together before assembly was the motor. We used a scrounged drill motor and hooked it up to a rechargeable battery pack. The battery pack and red vent lights (which turn on when the motor does) are housed in the back butt of the gun, where we also added a charging port. Mario was kind enough to design some quick housing for the motor, which we installed in the round middle portion of the gun. We rigged up a threaded rod as our drive shaft, which ran from the motor across the gap to the back plywood plate and lazy susan that on the ring.
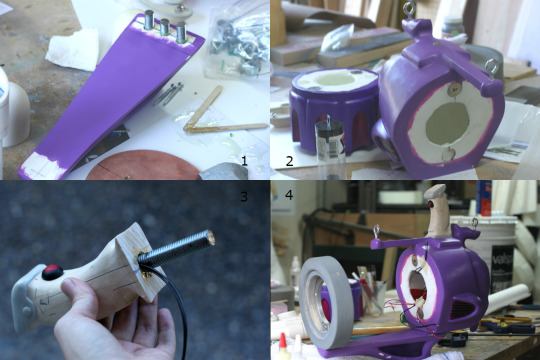
At this point, it became a dance between checking to make sure everything would work and assembling the gun. The round middle motor housing was secured to the back butt of the gun with magnets and the bottom strut was secured to the but of the gun with three large threaded posts that were epoxied in place. The ring was screwed in to the front portion of the strut and further secured with a threaded post. At one point, the gun could perfectly balance on just the strut!
For the handles, I cut out and shaped the sides of the front handle out of wood and to lay flush against the side of the ring. I detailed the handle with apoxie sculpt. The back handle was also shaped out of wood and wired with a button that connects to the spinning motor. While the front handle was screwed and epoxied in place on the ring, the back handle was set in place with a threaded post and 5 minute epoxy.
Before attaching the barrels, I painted the gun with acrylic paint. I started with some base shades of bright pink and built it up to the different shades of purple. The tips of the barrels were dirtied up a bit with some residual soot. I also did some slight silver washes over the darker purple areas of the gun to help further differentiate them and give a slightly more metallic look.
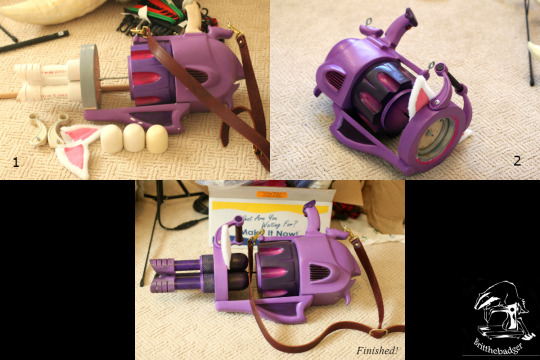
Before I declared the gun finished, I hand stitched and put together the leather shoulder strap and wrapped the front handle bar with leather. Lastly, I created the bunny ears with a single layer of Wonderflex covered in a short white fur and pink flannel, then tacked them to the wooden ring with wire nails. This created a flexible, fuzzy ear that would easily keep its shape. At this point, with a few nerve-wracking tests to make sure the spinning mechanism was working correctly, the gun was FINALLY finished! It was time to take it for a spin around PAX Prime 2014!
Thank you so much for reading! I would like to extend a HUGE amount of thanks to Mario of Arms Armor and Awesome for helping me out with puzzling this project out, teaching me more about electronics and mold making, AND for letting me use some of his tools and shop! I hope this helps and if you have any further questions, feel free to ask! 😀 ^_^