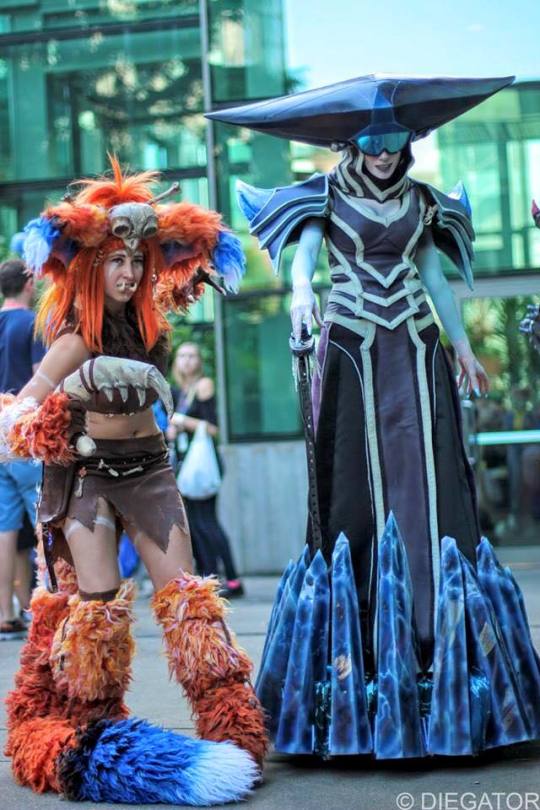
Photo by Diegator
Gnar, GNAR, GNARRRR! Working on Gnar
with Miss Morgan was an awesome six month project. I made the
boomerang first for a workshop, but I wasn’t planning
on creating the rest of the costume until Miss Morgan said she wanted
to make a Gnar and we jumped on the idea of turning it into a
collaboration project. This was my first full costume collaboration
where I wasn’t the one who would be wearing the final costume and I
gotta say, Miss Morgan ROCKED it!
Like always, the first step of any
project is the planning and design stage. Luckily, Morgan and I were
on the same page with the overall design of a cute humanoid Gnar.
Since the boomerang had a realistic vibe to it, I wanted to pull that
same sort of realistic, feral feeling into the rest of the costume.
We wanted to make a unique look for the costume by adding little
details wherever we could, and we ended up with the following design
sketch.

When we first started choosing
materials, we knew that the biggest hurdle would be the fur. After
some research, we came to the conclusion that we DID NOT want to use
faux fur fabric because faux fur is expensive, we would most likely
have to dye it ourselves to get the correct colors and gradients, and
the dying process uses water-based acrylic paints (not smart when you
live in rainy Seattle). Instead, we found a good yarn tail tutorial
on YouTube and
decided to brush out and blend yarn for all of the fluff. While yes,
the yarn method is very time consuming, it had some undeniable
benefits: yarn is inexpensive, comes in a wide variety of colors,
it’s far more customizable, and it looks more natural. Morgan was a
champ and did the majority of the fluff making, brushing, and sewing.
Mini tutorial time!!! Creating Yarn
Fluffs:
- Cut your yarn to lengths of
about 6-8”. It looks a bit like spaghetti. - Tie your yarn into a bundle with
a knot in the middle. We used three strands per for the arms and
legs and six strand bundles for the tail. - Brush it out with a cat brush.
You can brush multiple bundles at a time. - Use a hair straightener to relax
and straighten the fibers - Do one last quick brush and
tada! You have a yarn mustache! - Use
a needle and thread to sew the knot of the fluff to your base.
Curved needles work well for this. ^_^ - Feel
free to brush out the fluffs after they are sewn on and enjoy!
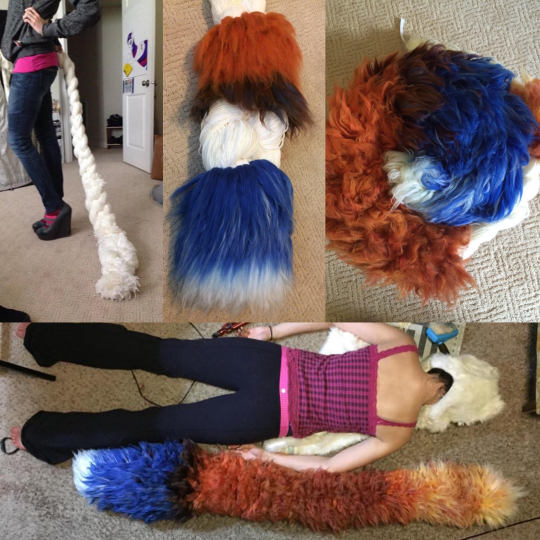
With this decided, we started on the
biggest, fluffiest part of the costume: the tail. This tail was not
for the faint of heart. It is a bit over 5’ long (it’s longer than I
am tall!!!) and the core is a giant four strand braid made entirely
out of yarn, which lets the tail curl and flex naturally. We made
the core in three sections and sewed them together before we started
adding fluffs. It attaches to Morgan’s waist by a carabiner at the
base of the tail to a D-ring on a thick leather belt. The tail took
four months and ten pounds of yarn to finish, so we were both
incredibly relieved when it was done.
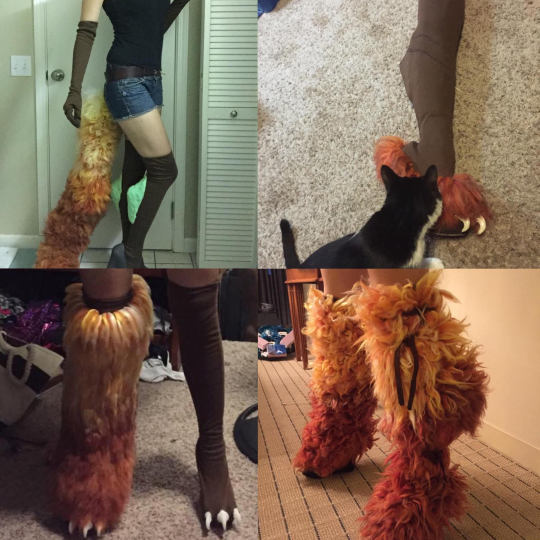
The legs and arms were the next big
fluff project. For the legs, Morgan first created a sock out of knit
fabric with a wide elastic around the top edge. Then we shaped some
thick upholstery foam for the hocks and glued them to the sock with
Barge Contact Cement. Next, we created an over-sock that fit over
the hocks and wedge platform shoe. The over-sock is tacked in place
with thread and sewn to the bottom edge of the shoe. For the arms,
Morgan made gloves out of the same knit fabric and sewed the fluffs
onto it. The claws were added on later.
With the leg base sorted out, Morgan
sewed the fluffs to the sock. To make sure the leg maintained the
right shape as she was sewing fluffs on, she stuffed it with a duct
tape form of her leg. Lastly, we added some leather ties around the
knee and ankle to bring back some definition in her leg.
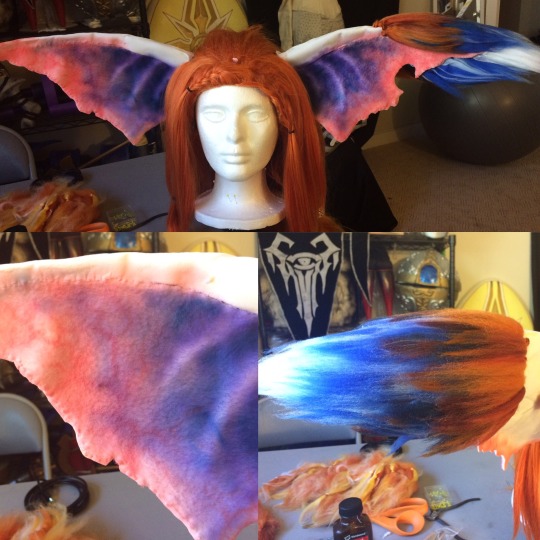
The ears were the last fluffy piece of
the costume. I created a cardstock template for the base ear shape.
Once the scaling was figured out, I sewed a wide headband into the
wig and installed two nails through the headband and wig to support
the ear. The base of the ear was made with Wonderflex to allow for
flexible, sturdy ears that Morgan could play with. The inner ear
ridges were shaped out of friendly plastic. The Wonderflex base was
then set onto the nails and wig with more friendly plastic.
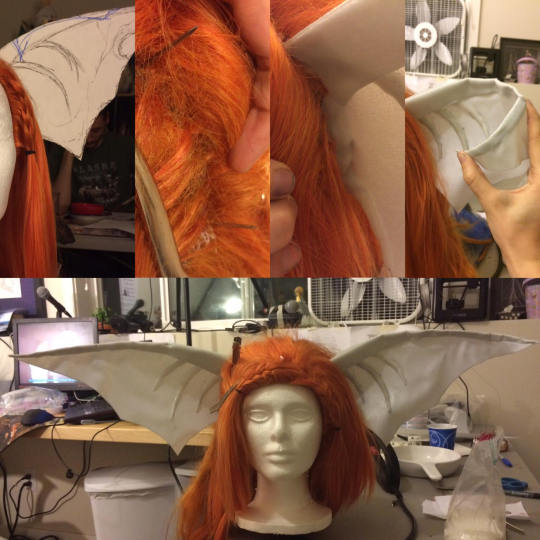
I added on a couple of layers of
batting and white spandex to the back of the ear for bulk and covered
the front with white fleece. The two fabrics were then sewn together
around the edge and I airbrushed the fleece. I was particularly fond
of how the veining came out. Once this was done, it was time to sew
on the fluffs!
With all of the fluffy parts of the
costume done, let’s take a look at them bones! Since I made the
boomerang first, before Morgan and I had even decided to do a
collaboration for Gnar, we’ll start there.
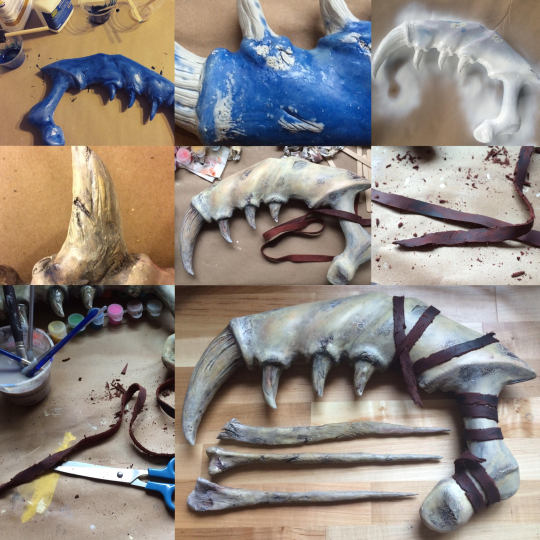
The boomerang core is entirely made of
pink insulation foam. I carved the basic shape out of the foam with
very coarse rasps and sandpaper, then coated the foam in two layers
of Epsilon.
After the Epsilon had cured, I sculpted details and reinforced the
teeth with Apoxie Sculpt. Next up was priming and painting. I used
acrylic paint and did a ton of various color washes, wiping and
rubbing away excess paint to make it look like real bone. The paint
was sealed with a clear spray paint, and the teeth got their own
super hard and glossy coat of clear 5-minute epoxy. Lastly, the
leather strap was weathered with scissors, an Exacto knife,
sandpaper, dirty paint water, and acrylic paint to make the prop look
well-loved.
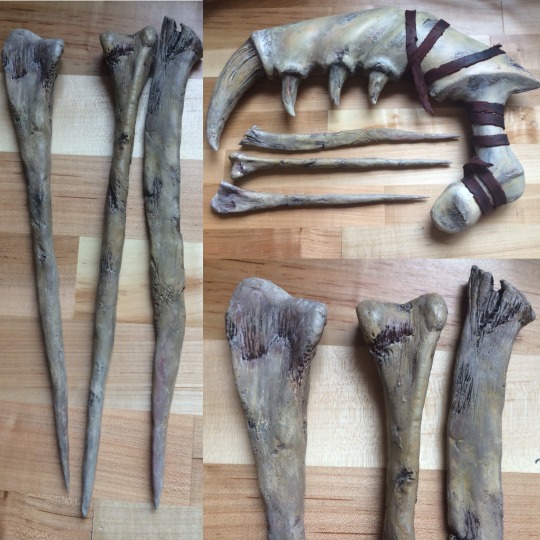
The hair bones were the next piece I
decided to tackle. During the designing phase, I thought it would be
more functional to have the hair bones separate from the skull since
it would also allow them to act like hair chopsticks. I started the
sculpting process by making an armature out of wooden kebab skewers,
tinfoil, and masking tape. The rest of the sculpting was done with
Apoxie Sculpt since it’s super solid and holds organic detail very
well. I tried my best to keep my sculpt fairly realistic so that it
would stay consistent with the rest of the costume.
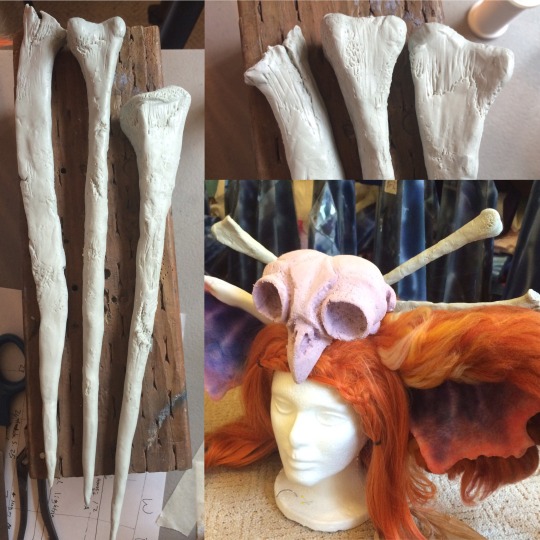
After the Apoxie Sculpt was cured, I
painted the bones much in the same way as I painted the boomerang and
sealed the paint with a clear protective coat.
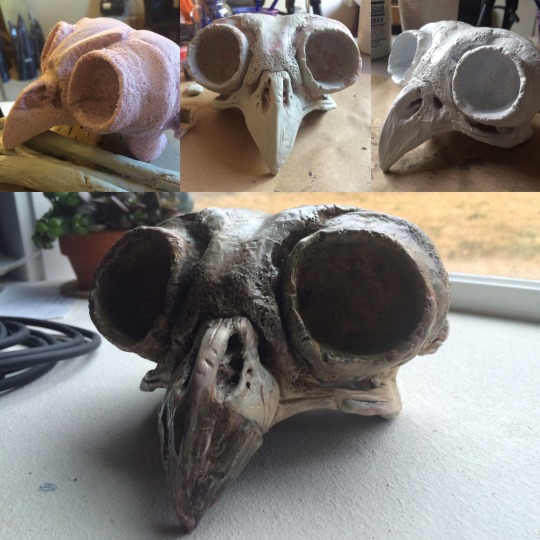
The last of the big sculpted bones was
the skull! I based the structure of the skull off of an owl skull
since the skull in the base character appears to have binocular eyes.
Since the skull was another bulky bone, I used the same method as I
used for the boomerang and created a base shape out of pink
insulation foam with rasps, sandpaper, and a Dremel. Once I had my
rough shape, I coated the skull with two coats of Epsilon to harden
and protect the foam. I also used 5-minute epoxy to adhere a barret
clip to the underside of the skull so that it would clip onto the wig
easily. Next came the Apoxie Sculpt detailing! I ended up shifting
my shape a bit and also added in the zygomatic arch by creating a
wire armature directly into the foam. Lastly, I primed and painted
the skull to match the other large bones’ paint scheme, did a clear
protective coat, and coated the beak with 5-minute epoxy (same as the
boomerang teeth) to give it added protection and some extra shine. It
looks so cute, cool, and creepy all at the same time!
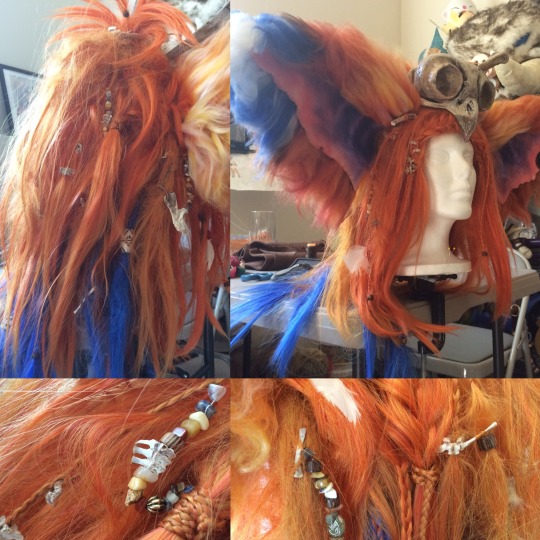
With all of the large bones done, it
was time for probably my favorite part of the costume: the wig! It’s
actually more like a mane than a wig, but who cares!?! I love how it
came together.
The base wig materials was a Fire
Orange Malinda wig as well as a set of Cobalt Blue and Light Copper
Red short wefts from Arda Wigs. We sewed in blue wefts to
the bottom back of the wig as well as some of the light copper wefts
to the center back of the wig to create a cool color blended effect.
We also added a few big dreadlocks out of both colors of weft and
sewed them in.
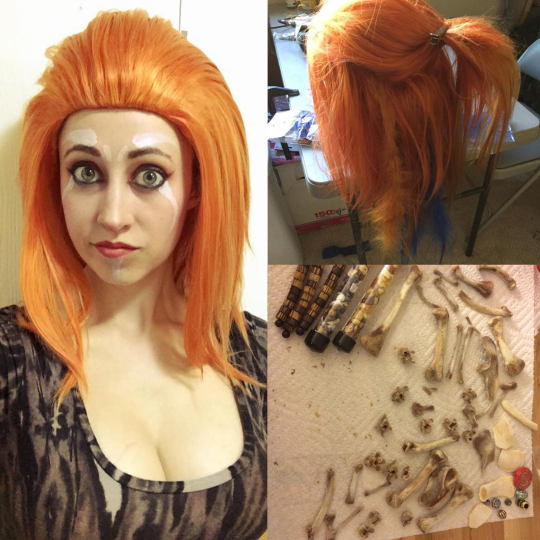
Once this was done, I created the top
knot and matted ponytail with a lot of back combing and teasing.
After creating a bunch of smaller matt, braids, and dreads in the
wig, I added in boiled and cleaned chicken bones from a rotisserie
chicken from the grocery store, a few feathers, beads, and small
rocks to complete the look. I especially loved using the vertebrae
at the bottoms of the smaller braids to act as hair ties.
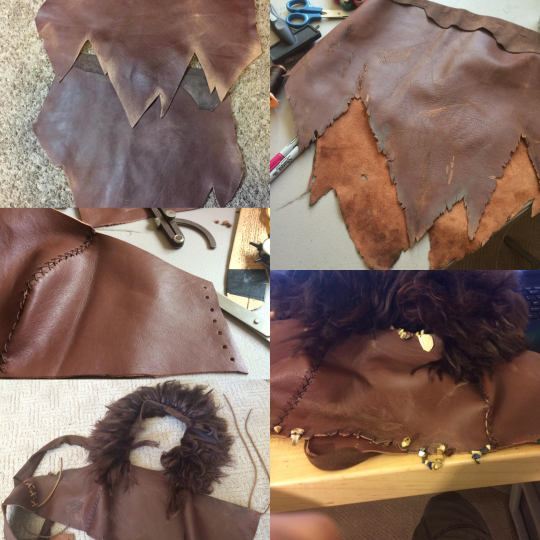
With the wig done and looking awesome,
it was time to focus on the actual clothing for the costume, which
consists of a leather top and skirt. The overall design of these
pieces was pretty simple since we decided to have them lace up the
sides. Morgan first patterned them out of muslin, then we cut the
leather, then we punched the holes for the lacing and started
customizing the pieces.
For the skirt, we added some soft
goatskin to the top of the skirt to hide the edge and create a nice
comfy waist band. Morgan did some basic weathering and ratted up
the edges with scissors, an Exacto knife, and sandpaper. I went back
over her weathering to add dirt and grime with dirty paint water,
sandpaper, and acrylic paint.
The pieces for the front of the top
were sewn together with a herringbone stitch. We also added some
straps to the top for added support and so we had a surface to attach
the brown neck fluffs. Next up was weathering the same way we did
the skirt. I added some trinkets, bones, and stone beads to the top
for some points of interest.
Onward to the final touches! I whipped
together a four strand round braid trinket belt out of leather lacing
and pouch for Morgan’s phone out of leather. All that was left then
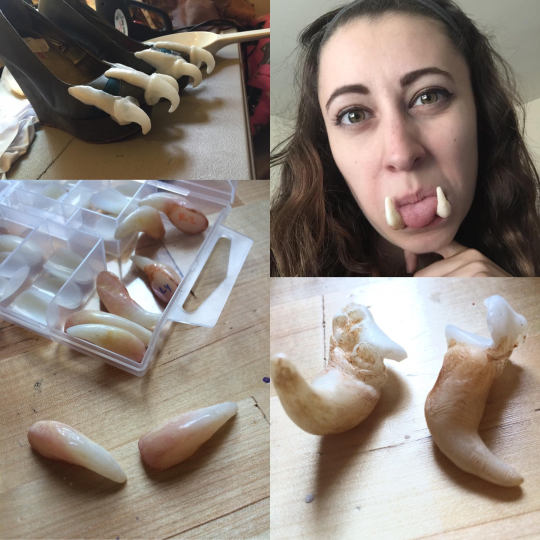
were the teeth and claws!
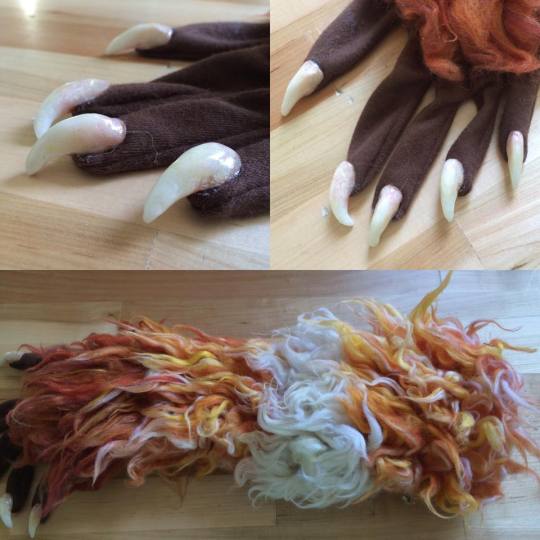
The hand claws were made with a base of
acrylic nail and friendly plastic sculpted over them. I did some
light washes for paint and sealed them with 5-minute epoxy sculpt to
make them super shiny and durable. Once they were made, we attached
the claws to the base glove with E6000 adhesive.
The toe claws were sculpted directly
onto the base shoe out of friendly plastic. They poke out through
the over-sock for the leg and were painted and sealed the same way as
the hand claws.
The tooth tusks were probably Morgan’s
favorite part of making the costume. Since friendly plastic is
commonly used in dental work, I figured we could mold some carefully
over her teeth. We took a small glob of friendly plastic and made a
cast of her lower canines and waited for it to cool. Once the base
glob was set, I went back and added some more friendly plastic to the
base to shape the rest of the tusk. Lastly, since teeth aren’t
perfectly white, Morgan obtained some theatrical tooth stain from
PNTA since it would be safer around her mouth than other paints and would
be the right colors.
And there you have it! Morgan ran
around PAX Prime 2015 adorably yelling, “Demaglioooo!”, and
making some of the most awesome faces. I had a blast with this
collaboration project with her and we both learned a lot. I
especially look forward to shooting Morgan in this costume up in the
mountains sometime! 😀
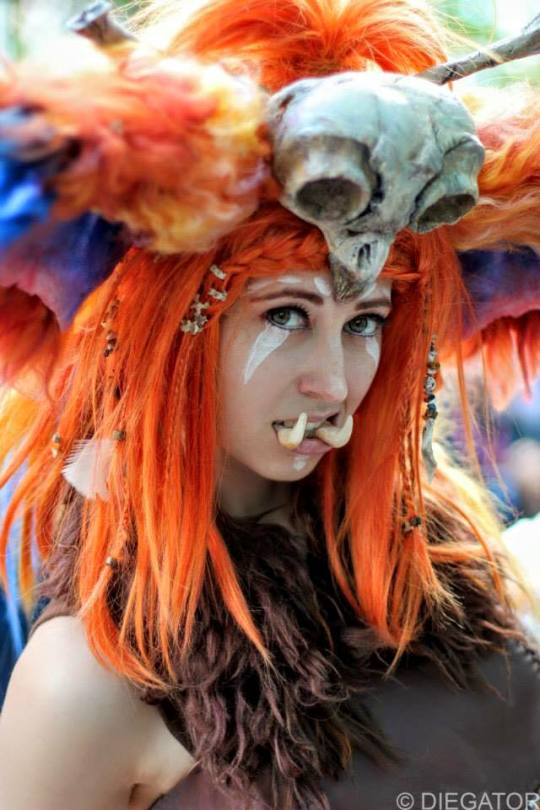
Photo by Diegator
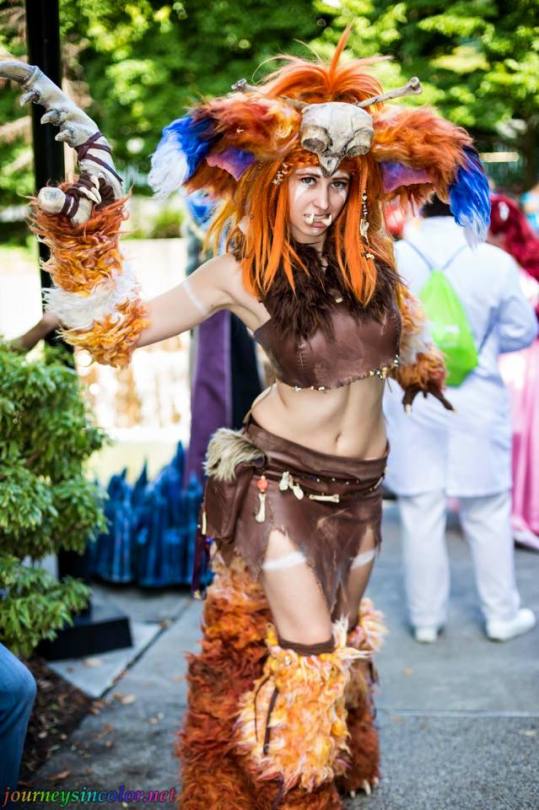
Photo by Journeys in Color
Thank you so much for reading! I hope
this helps and if you have any further questions, feel free to ask!
^_^
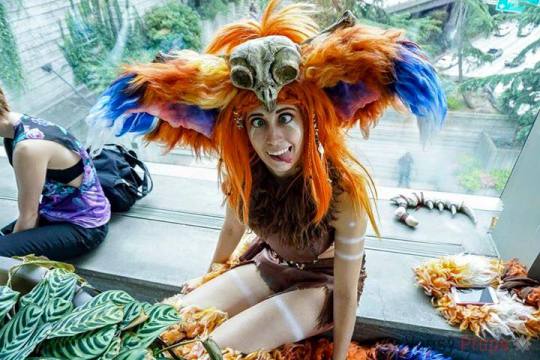
Photo by Vensy