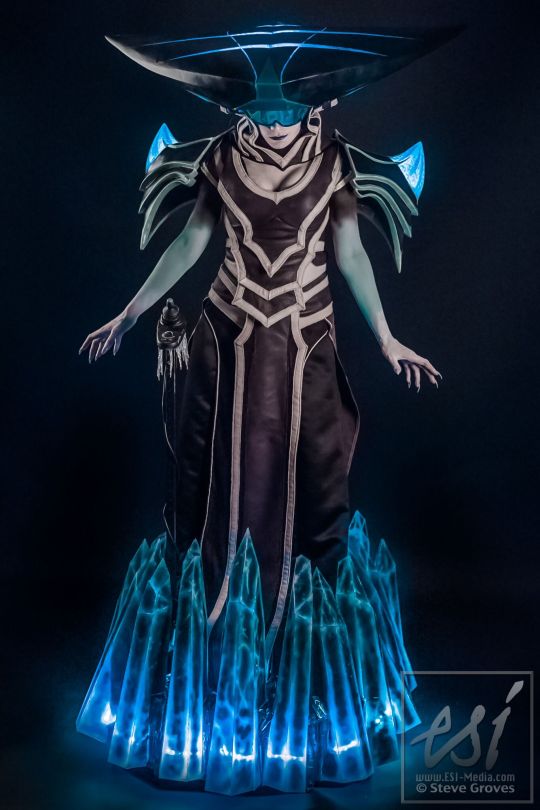
Photo by Steve Groves of ESI Media
Hi everyone, welcome to the Badger Den! This is my most recent
costume, Lissandra, which I’m debuted at PAX Prime 2015! This build
took me 2 years and 4 months to complete from initial conceptualizing
to roaming the con floor. I think it’s my best work to date and I
thought it would be fun to talk about the work that went into this
crazy, gigantic costume. Sooo…here goes!
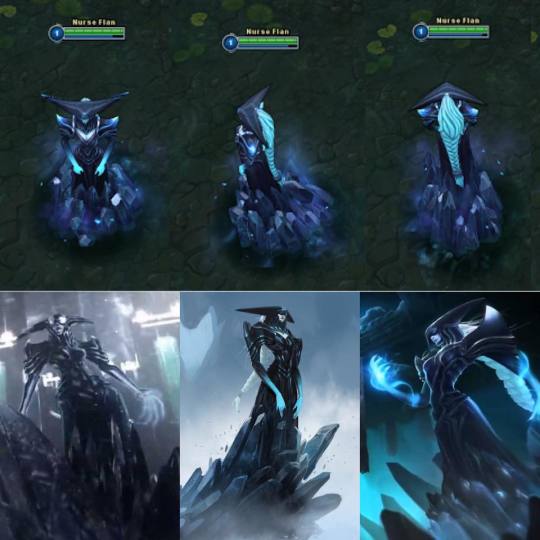
REFERENCES:
I
scoured the internet for different references to use to create a look
for Lissandra that I liked. I pulled the majority of my inspiration
from the 3D model because it was one of the few cases where I liked the 3D model
more than the splash art.
DRESS:
I
knew that I wanted the dress and neck piece to be flexible, so I used
leather for the bulk of the dress with some microsuede fabric for
texture. I found an
outstanding purple leather hide and a beautiful white goatskin for
the edging and I fell in love with the combination. There are 12
layers total.
I started off with
draping and patterning the layers in muslin.
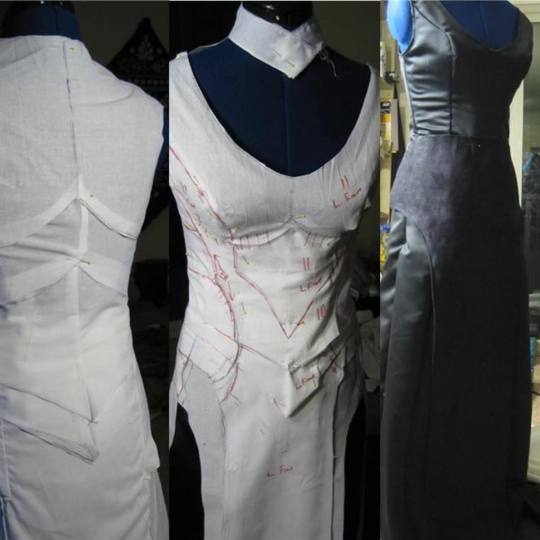
For the base
layer, I made a comfy black satin dress to reduce chafing. I
then split the rest of the dress into a skirt and bodice.
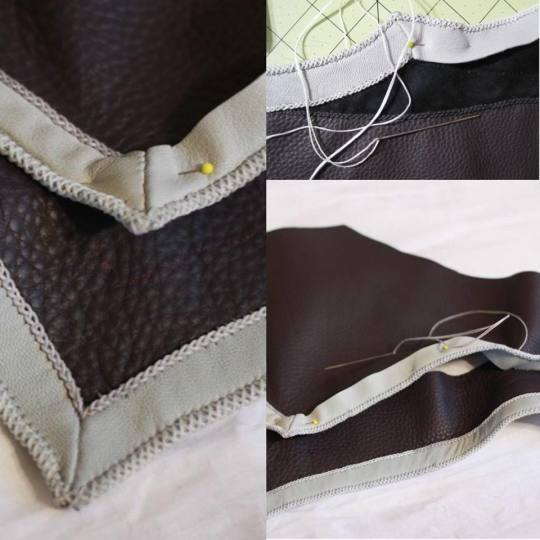
All of the leather
pieces were hand-sewn because of the thickness of the leather and the
stitches I wanted to use. I sewed the edging together with a Mexican Basket Weave Stitch, and used a Double Loop Applique Stitch to attach the edging to the dress.
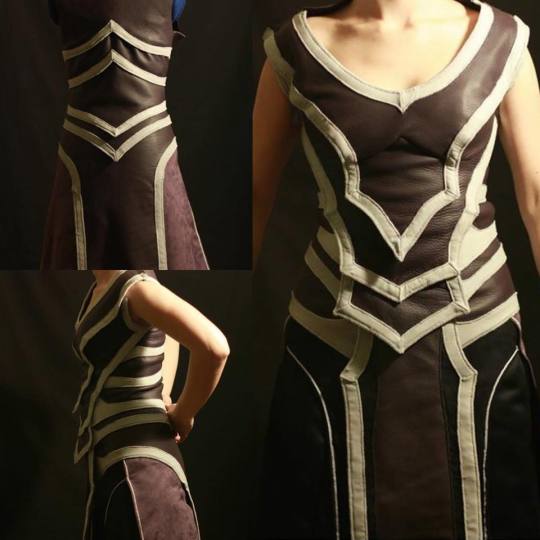
The skirt has four layers made of
leather and microsuede, and it wraps around my waist and gets laced
down the front just behind the tabard. The bodice is made entirely of
leather and has seven layers. It goes on over the skirt and zips up
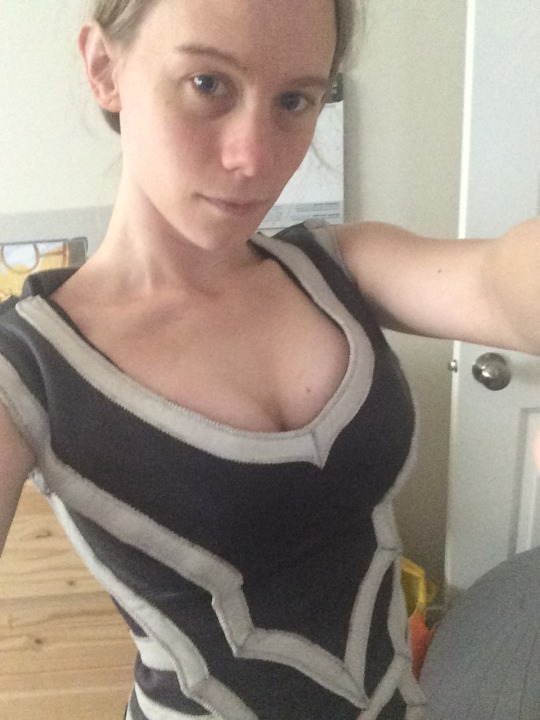
the side.
I left enough room in the bust to allow for padding to give the extra
amount of cleavage that Lissandra has. I had to use three bras, gel
inserts, and a sock to get the right amount of umph.
NECKPIECE:
When I was
designing the neckpiece, I knew that I NEEDED to have good, flexible
neck support because of the weight of the wig and helmet.
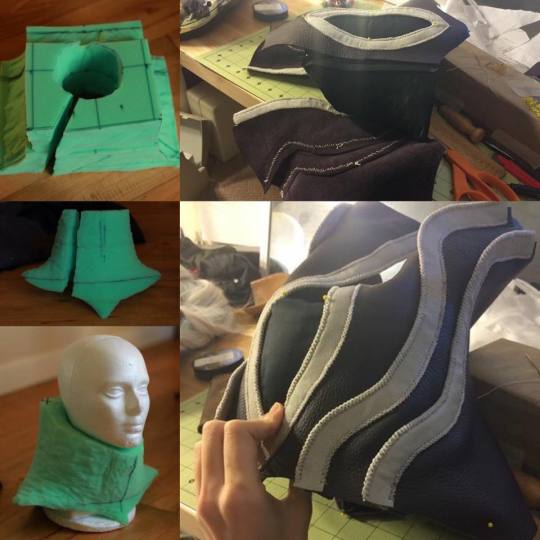
I shaped a block
of thick upholstery foam to my neck, and added a closure zipper on
the left side towards the back. I used contact cement to adhere foam
pieces to each other. Then I covered the foam in comfy black fabric
and added a few pieces of boning along the inside for support. On
the outside I covered the neckpiece in the same leather that I used
for the dress.
Once I got to this
point of the build, I noticed that what was left could be summed up
particularly well by the song, “Head, Shoulders, Knees and Toes”.
It became my theme song for the remainder of the build. 😛
Wig and Headpiece, Codename: HEAD
The wig is the
main reason why I needed the neckpiece to provide good support. It is
HUGE and oh so heavy. Instead of wearing the wig directly, I put it
on a motorcycle helmet. Not only does it save my own hair from being
ripped out, but it also serves as a good base for attaching the
headpiece.
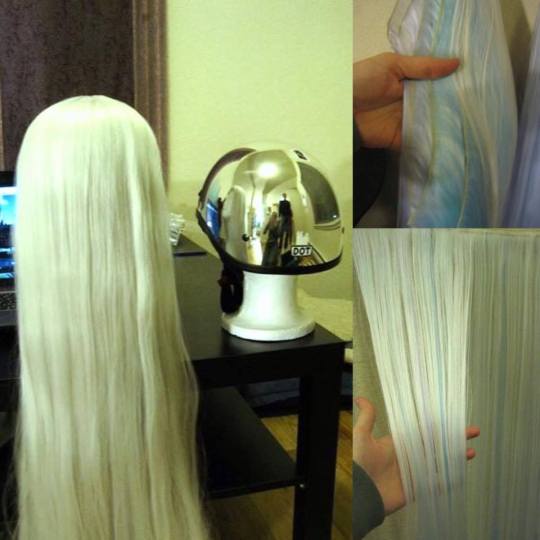
The
wig started out as a silver Le Tigre from Arda Wigs before I screwed it onto the helmet. I also purchased long wefts
of powder blue, periwinkle, and aqua to add some color depth to the
wig as well as extra silver wefts.
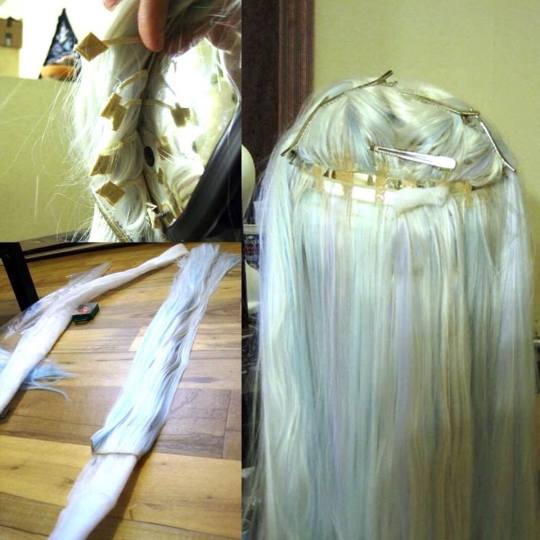
After combining
the wefts and adding color to the wig, I made three base cores of
batting for the braid to add bulk without adding weight. Once the
batting cores were made, I wrapped more wefts around them to extend
the base wig, cover the batting, and create the braid. The braid
pieces were sewn to the base wig.

Before
I could finish the braid, I had to create the poof at the back. I
shaped a pad out of some scrap upholstery foam, covered it in white
fabric, then styled the wig over the pad. After braiding the wig and
applying tons of hairspray, the wig was done!
The
headpiece was also a monster to build. Since the headpiece measures
40” from tip to tip, I designed it to be as light as possible to
keep neck strain to a minimum.
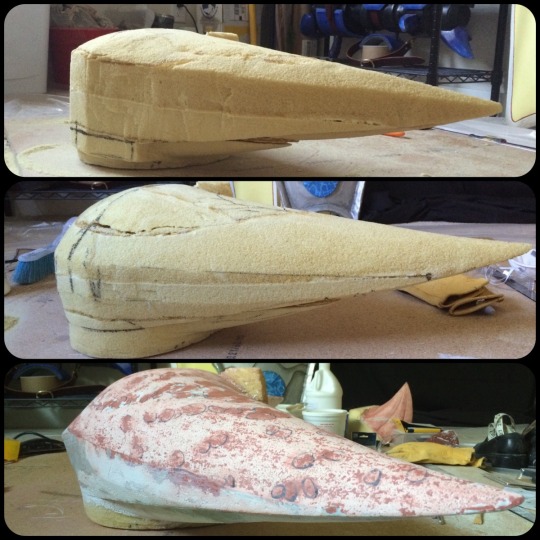
I shaped a master
buck from a 10lb expanding foam block. After many, many, many hours of shaping, carving, and
sanding, with saws, rasps, and sand paper, I managed to fill in the
gaps and smoothed it with gesso, Bondo, spot putty, and apoxie
sculpt.
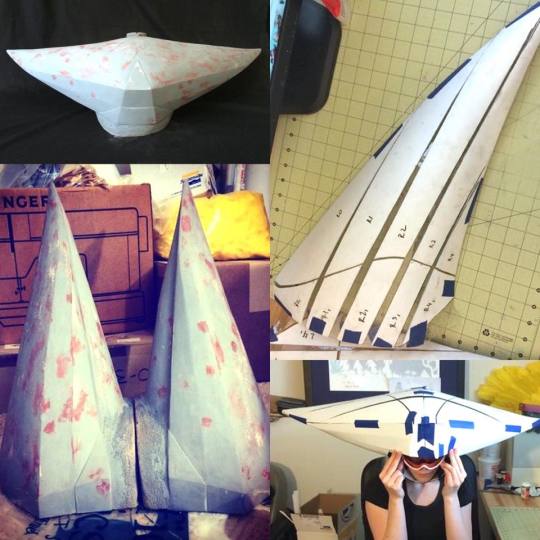
Once the master
buck was finished, I took it down to my good friends over at [Arms,
Armor, and Awesome (LINK:
https://www.facebook.com/tripleacosplay/?fref=ts
)] to cut it carefully in half and then vacuform the pieces. I used
.04” thick high impact styrene for the opaque regions and also
pulled the top of the form in .04” thick clear PETG plastic. I did
this so that I could create a light setup for Lissandra’s passive.
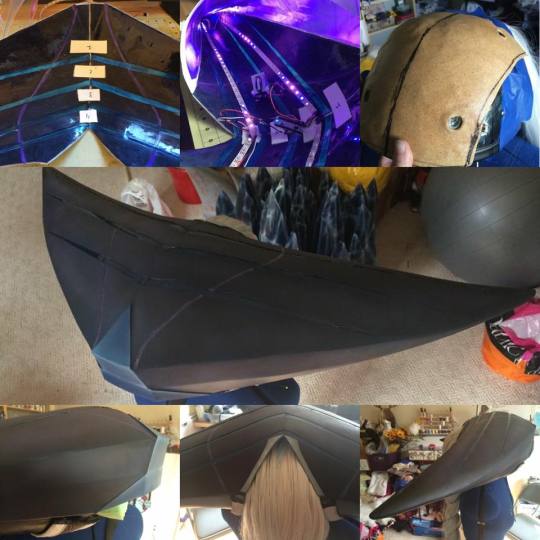
The lights are
NeoPixel light strips hooked up to an Arduino Micro from Adafruit. There is aluminum tape along the internal bottom side of the
headpiece to help reflect and diffuse the light. The headpiece is
attached to the helmet with a Worbla mini-helmet with embedded
magnets. In the end, we managed to reduce the weight from the 10lb
buck down to 1lb for the final headpiece. Final paint was applied
with airbrushed Tamiya acrylic paints and sealed with an acrylic
clear coat.
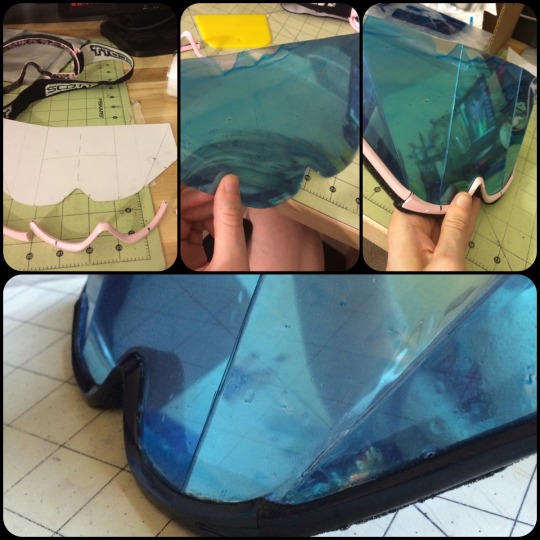
Lastly, the
stripes along the underside of the headpiece fill in the gap between
the helmet and headpiece. They are made from leather and kept in
place with velcro and magnets. The goggles were made with leftover
PETG plastic that I tinted blue with very thinned out Tamiya acrylic
paint, a butchered pair of thrifted ski goggles, and mirrored window
tint.
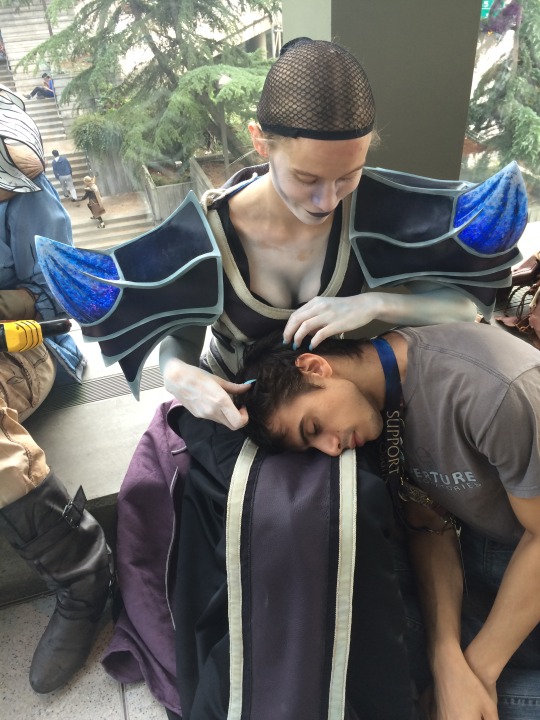
Pauldrons, Codename: SHOULDERS
Let’s just be
honest. Lissandra’s pauldrons are ridiculous. Those things are huge.
Anyway, I wanted to deviate a bit from her original concept and add
lights to the shoulder spikes because how cool would it be if the
spikes were made of ice and glow?!
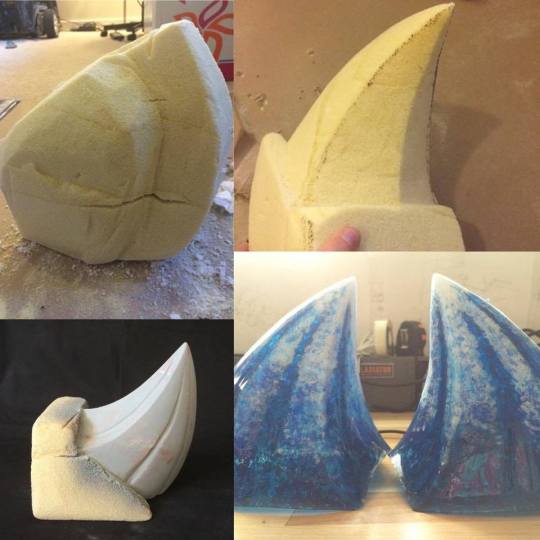
For the spikes, I
first shaped 10lb expanding foam into bucks. I then smoothed them out
with gesso, Bondo, and apoxie sculpt and vacuformed them with clear
PETG plastic. Before assembling the two halves of each spike, I
painted the inside with Tamiya acrylic paints so they would look good
in daylight while also remaining cool and translucent when they glow.
The rest of the pauldron was shaped from Worbla, craft foam, and EVA
foam. Now, Worbla tends to have a nasty texture that gets fuzzy when
sanded and I needed a really smooth, clean, and perfect finish.
Since the armor is not supposed to be flexible and I’m impatient, I
got rid of the nasty Worbla texture with very thin layers of Bondo.
After many hours of sanding the Bondo layer, I added edge details
with apoxie sculpt.
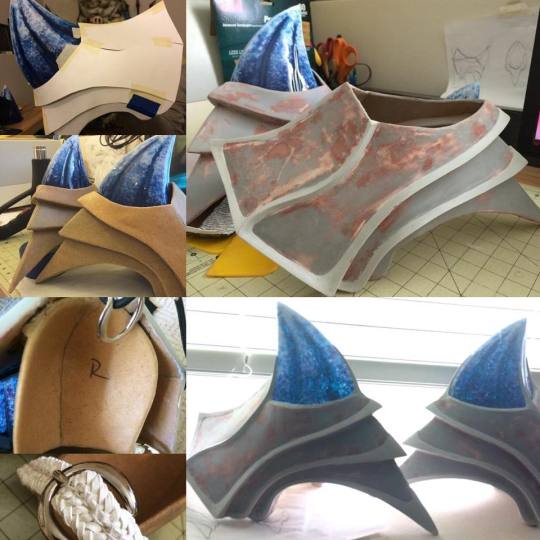
After many, many hours of sanding the apoxie sculpt, I installed the
shoulder spikes and sculpted the remaining details with more apoxie
sculpt. In order to attach these beastly pauldrons to my very tiny
shoulder, I fashioned a mini pauldron that is fixed inside the
massive one and fits over my own shoulder quite nicely.
There are straps and buckle attachments around my bicep and from the
top of the shoulder to a small harness I wear under the dress. I
wanted the straps to be soft, comfortable, and integrate well with
the rest of the costume, so I used soft deerskin lacing to make a
five strand braid sewn together with a herringbone stitch for a
highly adjustable system of holes for the buckle to go through.
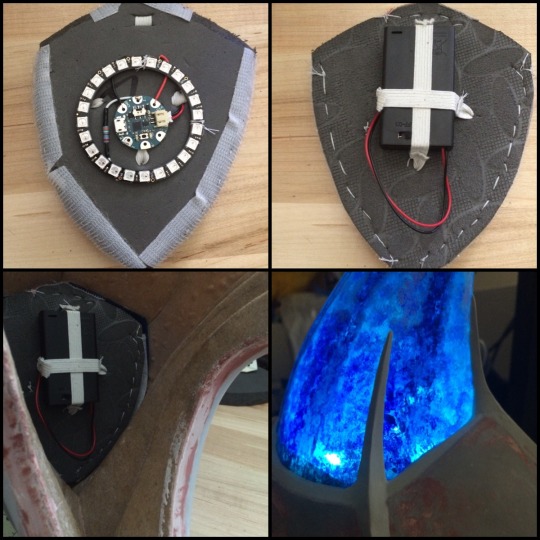
The lights are made up by a 24 NeoPixel ring for each pauldron and
controlled by an Arduino Gemma. I mounted the lights to EVA foam and diffused them with batting.
The EVA foam pad is attached to the inside of the shoulder spike with
velcro.

For the painting and finishing touches, I used an airbrush with
Tamiya acrylic paints and a clear acrylic coat to finish the paint
job.
Ice Crystals, Codename: KNEES
For
the crystals, I 3D modeled 15 base shapes in Blender.
Once I was happy with them and got them down to an average of 15
faces per crystal, I exported the files to Pepakura and unfolded the models into flat shapes. Once that was done, I
exported the files as a bitmap to Inkscape,
where they were simplified further and re-scaled to their proper
size.
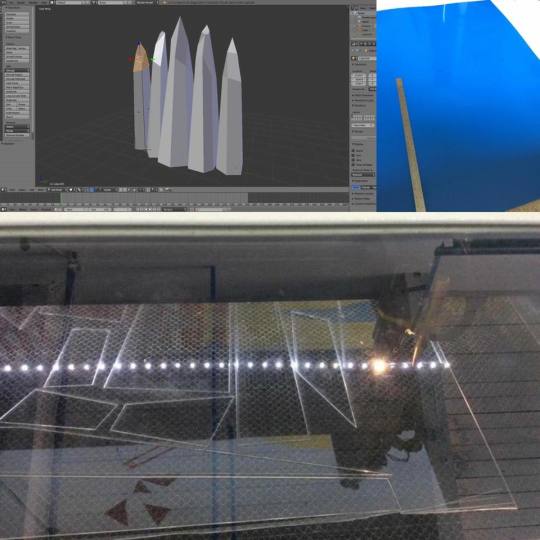
We put our final
files into a laser cutter and cut the crystals out of 1/16th
inch acrylic. Lucky for us, there is a MakerSpace nearby with a laser cutter that we could use. We made two sets of
the crystals, one at full scale for the outer edge crystals and one
at a smaller scale for fill. That brought us to a total of 30
crystals that would make up the base. The tallest crystal is 27”
tall.
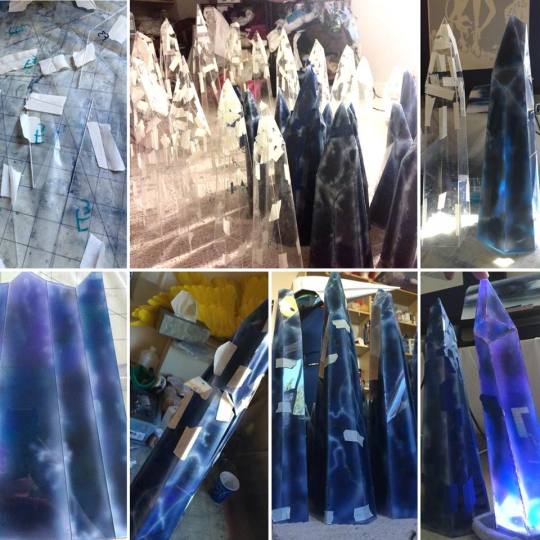
After we got all
of the pieces back, I dry fit all the crystals to make sure
everything fit together and no pieces were missing. I used an
airbrush to paint the backside of the acrylic pieces so that they
would be tinted, yet translucent enough for lights. Since I painted
the backside of the facets, the paint is protected from scratches and
I got to keep the natural shine of the acrylic. Once that was done,
I assembled the crystals with acrylic cement.
Moving Platform, Codename: TOES
The
the most common question I got while I was making this costume was,
“How are you going to be able to move with all of those crystals?”
Well, here, I’ll tell you!
After many, many
hours of thinking through how to get Lissandra’s gliding motion and
easily move around the con floor, I hit on a brilliant idea and I got
myself a powered wheelchair off of Craigslist!
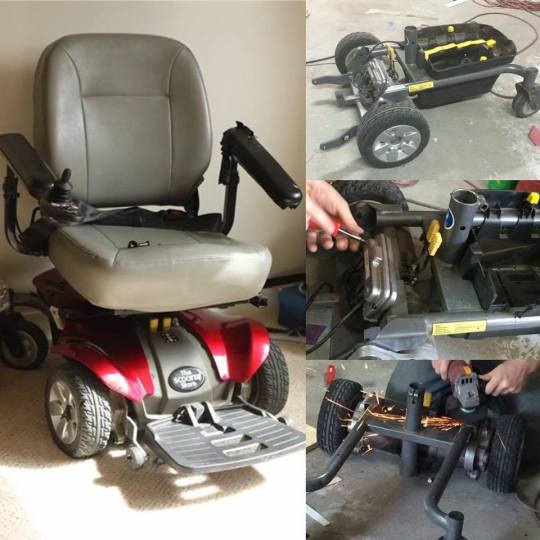
Used powered
wheelchairs are pretty easy to find and surprisingly easy to take
apart and modify. Everything I needed was already there. The
controller, motors, brakes, weight capacity, frame, battery power,
and tight maneuverability.

We
designed a wooden frame that fits around the wheels to hold the
crystals. It’s designed to break into two pieces for travel and
transport. It’s pretty ugly, but it does the job! I
stand on a 17”
platform which puts the entire costume height at around seven feet. I
have a “butt bar” that that hides under the dress that I lean
against and supports me while I move around. The back panels have
hinges so that they flex over rougher ground and the back-most point
has a rolling caster wheel.

The
crystals were cut to slot over the lights and onto the wooden frame
with pins and velcro which made everything easy to assemble and
disassemble. The lights are NeoPixel strips from Adafruit connected to an Arduino Uno.
After doing some
lighting tests, I found that I still needed some fill lights behind
the crystals, so I added in some puck lights with some scrap lighting
gel to tint the light to the correct color. The final touch was
crinkling up some cellophane and placing it between the crystals with
some hot glue to fill in any gaps between the chilly ice!
Makeup and Final Touches:
With everything
finally built, I had to deal with the very last details to become
Lissandra: the makeup!

Since Lissandra
is, well, a witch, I got some truly wicked acrylic nails (I mean
TALONS) done at a local nail salon. After figuring out how to
function with them on, I was able to give the very best head
scritches!
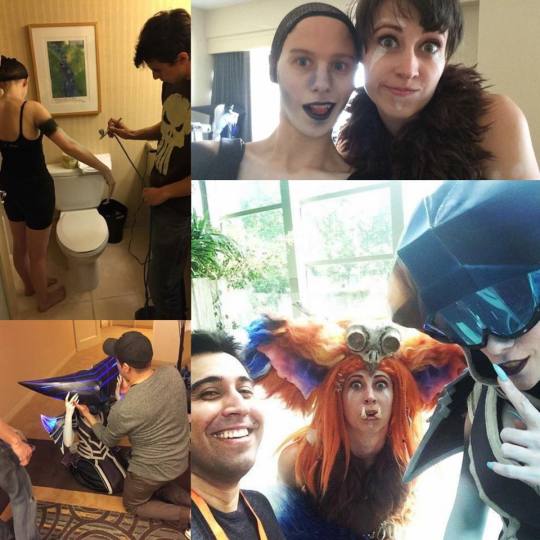
For
the makeup, day of, I had Ian and Miss Morgan use the airbrush to apply Proaiir Hybrid makeup paint to my arms and chest. It applied very smoothly and didn’t rub
off, except in very high-friction areas (such as the under arm
pauldron straps). For my face, I used Mehron Paradise makeup for the base and set it with white powder. I finished off the
contouring with shades of blue and purple eyeshadow. It was nice
that I only had to apply makeup to the lower half of my face, but I
looked pretty silly without the headpiece on! 😛
Once the makeup
was on, it was time to roll to the con floor! I’m extremely happy
with how this costume turned out! I look forward to wearing it again
at local cons!
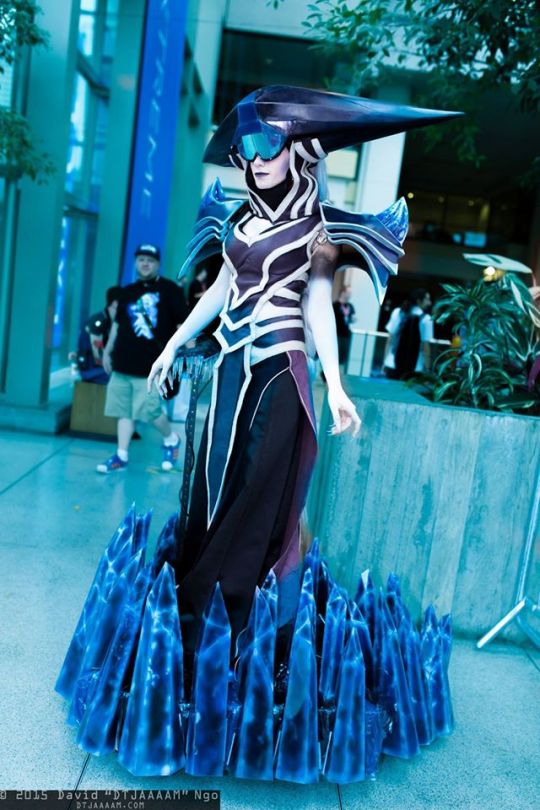
Photo by David Ngo

Photo by Diegator
Thank you for reading! I would like to extend a special thank you to
Ian and his friend, Dane, for helping out with the coding for all of
the lights as well as everyone around me who supported me through
this long, grueling, and rewarding process! Also, a huge thank you
again to Ian and to Hard Luck Hero for being my handlers at PAX Prime! I wouldn’t have been able to
make this gargantuan costume happen without their help!
TLDR: timelapse video of the making of Lissandra via ThoseFuckinNerds ^_^
If you want more updates on my work, you can subscribe to ThoseFuckinNerds on YouTube, or you can find me on Facebook, Twitter, and Instagram as “Britthebadger”. I also stream my work on Twitch, so if you have any questions you can come watch and hang out.